Wednesday, November 28, 2012

Skull-rific!

Happy Hump Day!!  This week has been going by so slowly, I think it's because I was off on Monday and I usually take days off on Friday, so my weeks all messed up!  Will Friday ever come?

I've got a long overdue review of some cute skull water decals I received from KKCenterhk for review.  You may remember from my EPIC 100 Follower Giveaway, that KKCenterhk was kind enough to provide some cool stuff for my giveaway - the alphabet stamping set, won by Becca from Nail Narcotics and the cute gold peacock water decals, won by Maggy from the Daily Lacquer.  Becca did this fabulous mani, dedicated to her favorite nail artist - moi, lol, you can take a peek, here.

Anyhoodle, onto the review - I picked the Rock Skull Water Decals, because they are so darn cute.  I was a little intimidated to use these, one, because they are so cute, I didn't think I could do them justice and two, because I was worried they would be SUPER difficult to apply.  Totally not the case - I have to say, I'm super surprised at how easy these were to use.  All you do is cut out the decal you want to use, soak it in a bit of water and carefully slide the decal from the paper.  You have to make sure your nail is dry and not super soaked like I did on my first try.  The decal won't stay on a wet nail so I had to take it off and make sure my nail was dry.   I just held the decal in my other hand and dried off my nail, super easy.  Once it was dry, I placed the decal and fiddled a bit to get rid of wrinkles and VOILA!  I didn't use tweezers and I don't think I would when I use these again.  I think these are sturdy enough if you are gentle to withstand the handling.

Skull Water Decals Nails

Skull Water Decals Nails

Skull Water Decals Nails

Apparently I was in the mood to try every technique on my nails last night, water decals, gradient, stamping, leopard, polka dots and glitter - it's a little much, but how CUTE is that decal?  There's 25 nail decals in a set and they're super reasonable, at only $2.82 USD.  If you're interested in getting some of these babies for yourself visit http://www.kkcenterhk.com/ and search "skull water" or just click here, the item # is WDSY558.  Want something a little more serious, how about trying the gold peacock water decals, you can find them here.  Is stamping more your style?  You can pick up the alphabet here and here.

Thankfully, I've done this post in time for you guys to use my 10% off coupon to get your own goodies from KKCentrehk, the coupon code is:  nearlynailed and expires Jan 31, 2013!! 

Holla, N

Tuesday, November 27, 2012

Baby, You're a Firework

Hi polished peeps!

Quick post today, I'm a day late (again) posting for the Lazy 15 Challenge - bonfire/fireworks.  I chose to do fireworks, my friend brought me back a beautiful glittery glitter from Munich and I knew it was perfect for this mani, hope you enjoy!

Fireworks Nail Art

Fireworks Nail Art

Fireworks Nail Art

And another special bonus - my right hand, making a rare appearance!

Fireworks Nail Art

Base Coat:  Orly Bonder
Base Color:  Flormar - 393 (no name, but still pretty cool!)
Top Coat:  Finger Paints - Black Expressionism
Seche Vite

Holla, N


Sunday, November 25, 2012

Lazy Oceanic Review

Hello Friends!  I'm a little late with this post, it was supposed to be up on Friday, but I had plans on Friday and then headed up island bright and early Saturday morning for my auntie's 50th birthday bash.  It was a fun time, but no internet access so I felt a little cut off from the world!!

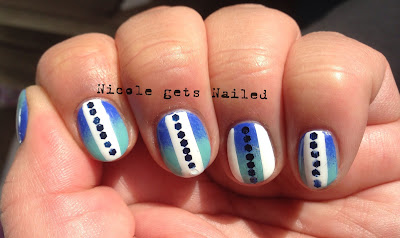
Friday's prompt for the Lazy 15 Challenge was underwater creatures/water mythical creatures.  I was having major polish block and couldn't think of what to do, so I went with more of an ocean theme.  This mani also gave me the opportunity to finally review my glequins I got from the Born Pretty Store!!  I've been holding off on using these because my nails are SO short, but they've grown a bit and turned out pretty good, if I do say so myself!

This is my second set of products from Born Pretty Store for review, you can see my previous review on the 3 Star/Round/Heart Rhinestones Acrylic UV Nail Glue Clamp Kit here.  This time around I was so excited to try the hexagon loose glitter, most widely known as glequins.  You get a set of 12 different colors in individual containers for a total price of $5.35 USD.  Everything ordered from the Born Pretty Store is free shipping, so these are a steal.  You get a TON glitter and I'm not even exaggerating - it would take a while to use up this supply.  As usual, this came within a week of ordering, which I think is very reasonable coming from China.  They package items in a bubble envelope so everything arrives secure.

Application of these are a little tricky for someone as anal as me, I need to have everything uniform and in the right order, so it sometimes was a little difficult getting everything lined up.  I wasn't quite sure how to adhere these beauties, so I tried a couple of different things.  First, I used white glue and put a little on my nail, not my whole nail as that dries way too fast, but just the area I was working in.  I then used an orange stick with a little of natures glue (read spit) to pick up the glitter and placed it on my nail.  Using white glue gets a little glooby, you have to be really careful and put a very thin layer of glue on the area you are working in.  Next, I used the same method to pick up the glitter and placed them in tacky nail polish.  This wasn't my preferred method because if you accidentally drop a glitter where you don't want it, it's harder to correct without ruining the polish underneath.  I'm wondering if I used a coat of Seche Vite and once that was dry, use a layer of clear nailpolish to place the glitter - this will be what I try next as I think this will be the best method. I also had some issues with the glitter falling off the the tips of my nails - I had to put the ones on the end back on a couple of times and as you can see from my daylight picture, one of the glequins fell off before I could photograph them.  I'm thinking if I change up how I adhere them to my nails, they will stay better, but don't let that discourage you from getting these pretties, because they are SOOOO worth it!  I will be using these again, though if anyone has any tips on how to get these puppies to stay put, I'm all ears!!

Blue Gradient with White Stripes and Glequins

Blue Gradient with White Stripes and Glequins

I really loved what I came up with and it really reminds me of the ocean.  If you are interested in getting this product, you can click here or go to the Born Pretty Store website and search Item ID: 3103.  Until Jan 31, 2013 you can use the special code found in the banner below to get a 10% discount!!  That's not a huge discount, but any discount is SUPER!


And to finish off this post, here's a shot of both hands together, I ended up doing 'bubble's' on my right hand because I had run out of time to finish the pretty stripes!

Blue Gradient with White Strips and Glequins

For the gradient I used:  Sally Hansen:  Pacific Blue and Finger Paints:  Tiffany Impostor.  For the stripes, I used Finger Paints, Papier Mache and the bubbles were done with acrylic paint.

Hope this review was helpful and that you enjoyed my blinged out mani!!

Holla, N


Wednesday, November 21, 2012

Vote for Pedro

Hello Polished Lovelies!!

Welcome to day 9 of the Lazy 15 Challenge - Disney movies/characters.  I wanted to do something out of the box for this one, I realize now this isn't "out of the box," but it is an obscure Disney character I found using good ol' google!  Pedro the Chilean airplane - according to wiki Disney, Pedro appeared in one of Disney's collection of shorts called Saludos Amigos.  As you can see, Pedro is a small airplane that takes his first flight to pick up the mail in Medoza.  Wiki says that cartoonist, Rene Rios Boettiger (Pepo) was disappointed that Pedro was the image that the outside world had of Chile, so he created one of the most famous Latin American comic magazines, Condorito. (paraphrased from wikipedia)

I used a combination of photos as the inspiration for this one, mainly this one here and this one here.  Yay, you can watch the short on YouTube, click here if you have a mo to check it out - so cute!

Pedro Disney Cartoon Nail Art

Pedro Disney Cartoon Nail Art

Pedro Disney Cartoon Nail Art

Pedro Disney Cartoon Nail Art
Ugh, I wish the top coat I used didn't bubble, this is extreme macro though, so it's forgiven :)
Holla, N


Tuesday, November 20, 2012

International Transgender Day of Remembrance

Hello friends,

Today is the International Transgender Day of Remembrance (TDOR), a day to memorialize those who have been killed due to anti-transgender hatred or prejudice.  The lovely Lacquer Lad wrote a very heartfelt post here and has linked in a couple of bloggers to participate in this day of remembrance. TDOR was started by Gwendolyn Ann Smith, a transgender advocate to honour the memory of Rita Hester, a transgender woman who was killed in 1998.  A web project “Remembering Our Dead” and a San Francisco candlelight vigil was held for the first time in early 1999, these two things led to an annual memorial.

"The Transgender Day of Remembrance seeks to highlight the losses we face due to anti-transgender bigotry and violence. I am no stranger to the need to fight for our rights, and the right to simply exist is first and foremost. With so many seeking to erase transgender people -- sometimes in the most brutal ways possible -- it is vitally important that those we lose are remembered, and that we continue to fight for justice."  Transgender Day of Remembrance founder Gwendolyn Ann Smith

I have to say that researching TDOR for this post has certainly opened my eyes to a world I knew nothing about.  Yes, on the peripheral, I knew that violence, hatred and prejudice towards people that are different exists.  But, the magnitude of this hate is so hard for me to grasp.  When you live in your own little bubble day to day, it’s hard to comprehend that a world beyond yourself exists, especially when it’s so ugly.  It’s way easier to bury your head in the sand than face the fact that the human race is slowly killing that which should make our world a better place – our differences.  My heart hurts not just for these men and woman who have been brutally murdered, but for their friends and families.  Whether the lives they were meant to lead were supported or not, no one should have to lose someone to such ugly violent hatred.

Please take a moment to look over this list from the TDOR website. This is the list of names of people who are being remembered this year on November 20th. Please note that the list is incomplete and is constantly being updated.

I’m not the most eloquent and there is so much information I have missed, but if you have the time, please check out these links for more information about the Transgender Day of Remembrance:

-          There is really great information on GLAAD’s website, click here for more.
-          Transgender Visibility Timeline
-          A great article written by Gwendolyn Ann Smith can be found here.
-          Click here for a list of links on the “Remembering Our Dead” website.


International Transgender Day of Remembrance Nails

International Transgender Day of Remembrance Nails

International Transgender Day of Remembrance Nails

Please join me in visiting the other bloggers participating in this day of remembrance by clicking on the links below.

Holla, N

Monday, November 19, 2012

Lazy Cupcakes

Hello, short post today, I've got an awful headache and still need to paint my nails.  On the plus side, I did manage to make dinner tonight - the hubby was incredibly impressed :)  Without further ado, day 8 of the Lazy Day Challenge - dessert!

Pastel Cupcake Nails

Pastel Cupcake Nails

Holla, N


Sunday, November 18, 2012

At Long Last

Hello friends!

Welcome to my final post for the 31 Day Challenge!!  A sad and happy day all in one - sad that I won't be connecting with my fellow challengers every three days and happy (and also a little proud) that I've completed the 31 Day Challenge!  I've met so many amazing artists and seen some really great mani's, it's hard to believe it's over.  I'm looking forward to continuing to follow your blogs and eager to see what new and amazing art you come up with!!  A big honkin THANK YOU to Kimber from Kimber's Lacquer Korner for pulling us all together, you have been an awesome host and I'm so glad to have met you and to call you ma girl!  What are we doing next?!?  LOL!

I wasn't sure whether the prompt for this day called for a recreation of one of the mani's I did or one of my fellow participants.  I decided to play it safe and recreate one of my own favorite mani - Day 3 - Yellow - mostly because of the neon yellow, gotta love me them neons!!

Neon Yellow and Grey Chevron


Neon Yellow and Grey Chevron

Neon Yellow with Grey Chevron
Oh, look at my long beautiful square nails - it really hits home how short my nails are comparing my nubbins now to my long beauties then :)

Dark Grey:  Essie - Over the Edge
Yellow:  Nina Ultra Pro - Solar Flare
I used arcylic paint for the lighter grey stripes.
Top Coat:  Seche Vite, which shrinked the poop out of this mani as you can see from the first photo.

Here's a slide show of all the mani's I created for the 31 Day Challenge - this was super fun to put together, it was neat looking back on what I created and what I liked and didn't like - also my nails have changed shapes so many times - oh to have strong long nails!!


Please show some love to my fellow artists by clicking the links below.

Holla, N


-Kimber at Kimber's Lacquer Korner
-Kat at Hooked On Polish
-Diana at Nails By Diana
-Aly at Wonderland Beauty
-Meredith at Perfectly Polished
-Nicole at The Color Republic
-Kate at The Painted Pony Nails
-Cee at Absolutely Cee
-Sam at Polished Art
-Nail Narcotics
-Nicole at Nicole Gets Nailed
-Shelby at Shelby's Swatches
-Stephanie Louise at All Things Beautiful 
-Mixed Mama
-Joanna @ Sweet Polish of Mine
-Patty Greenberg
-Liz and Lisa @ Lozlosa 
-Mari at Nailista
 -Greta at How Was Your Day?
-Miss L at Beauty by Miss L 
-Gini at Sassy Paints
-Chameleon Stampede 
-Pam at Nail-E-Glance
-Me, Myself, and Polish
-Robin Sparkles 

Friday, November 16, 2012

Lazy Roses and Bows

Hiya everybody!  Welcome to day 7 of the Lazy 15 challenge - feminine nails.  It may have looked like I missed day 6 of the challenge - favorite color, but I did a guest post for Jessie of Nailed it NZ that used my favorite color - NEON, click here to check it out!

Today is my last official day off - I've been off since last Thursday, back to work on Monday.  It's been a nice relaxing week off, I haven't done much, definitely not all the things I wanted to do, but no matter, it was nice to enjoy day time TV and snuggles with my puppers!

White Vintage Roses on Black with Pink Bows

White Vintage Roses on Black with Pink Bows

Base Color:  Finger Paints - Black Expressionism
I used acrylic paint for the roses and bows.
Top Coat:  Seche Vite

Have a looky loo at the other folks doing feminine nails today for the Lazy 15 by clicking on the links below!

Holla, N


Thursday, November 15, 2012

Learning the Houndstooth

Hello Friends!  Welcome to the second to last day of the 31 Day Challenge  - Inspired by a Tutorial!

When I first started blogging, one of the first tutorials I watched was from Chelsea at Chelsea King's Get Nailed.  This girl is seriously talented and her tutorials are always informative and easy to follow.  I choose to do her Houndstooth tutorial - which you can view here.  I wanted to switch it up a bit by using red instead of the Tiffany Blue she used, but that looked awful, so I used a similar color to what Chelsea used.  I'll show you all my attempts - I took this off so many times, no wonder my cuticles are all red!!

Houndstooth with Tiffany Blue

Houndstooth with Red

Houndstooth with Red

Houndstooth with Red

Please show some love to my fellow challengers by clicking on the links below.  Check back Sunday for the last day of this challenge - a recreation of our favorite challenge mani!

Holla, N

-Kimber at Kimber's Lacquer Korner
-Kat at Hooked On Polish
-Diana at Nails By Diana
-Aly at Wonderland Beauty
-Meredith at Perfectly Polished
-Nicole at The Color Republic
-Kate at The Painted Pony Nails
-Cee at Absolutely Cee
-Sam at Polished Art
-Nail Narcotics
-Nicole at Nicole Gets Nailed
-Shelby at Shelby's Swatches
-Stephanie Louise at All Things Beautiful 
-Mixed Mama
-Joanna @ Sweet Polish of Mine
-Patty Greenberg
-Liz and Lisa @ Lozlosa 
-Mari at Nailista
 -Greta at How Was Your Day?
-Miss L at Beauty by Miss L 
-Gini at Sassy Paints
-Chameleon Stampede 
-Pam at Nail-E-Glance
-Me, Myself, and Polish
-Robin Sparkles 

Tuesday, November 13, 2012

Guest Post - Nailed it NZ


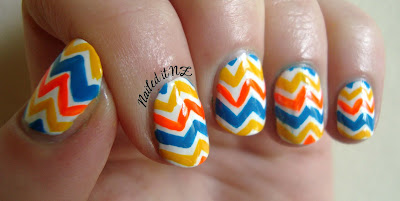
Hi everyone! I’m Jessie from Nailed it NZ, and Nicole and I are doing guest posts for each other today.  I’m from New Zealand and started my blog about six months ago after realizing I was posting my nails on my personal facebook page a bit too much! I LOVE doing nail art; it’s turned into a big part of who I am. Anyway, today I’m going to show you my zig-zag nails and how to do them.

Guest Post Nailed in NZ

There’s a little story behind these nails – I recently broke a nail (I’m sure you guys will understand how COMPLETELY TRAUMATIZING this is!) and had to cut all my nails short. So now they’re tiny :/.
I decided, in the end, that this was a good opportunity to find some nail art designs that look good on short nails and so this month I’m focusing on doing lots of semi-easy tutorials that people with short nails can do. This is my third one, and I’d say it’s of medium hardness – those lines can be tricky!


I ended up only using Jordana nail polish for this manicure - I’m pretty keen this brand. It’s cheap ($5) and hasn’t got a few of the nasty chemicals in it that are in other cheap brands. The pop art polishes do get a bit gluggy over time but for the other ones stay fine for years. My favourite brands are OPI and China Glaze but as they’re between $20-$30 each here I tend to accumulate many more Jordanas!

Guest Post Nailed in NZ

A few tips that I couldn’t fit in the tutorial:

  • Always use a base coat first. This might seem obvious, but I didn’t know it when I first started!
  • When you apply your top coat, make sure you have a fair bit on the brush and do it in as fewer strokes as possible – this’ll discourage the design underneath from smudging.
  • This (and any) nail art is best done at a table, with both arms/hands resting on something stable. It’ll stop the shaky hands (but so will practice).
  • You don’t have to do every nail like this! The ring finger and thumb can look good with a design while the others only have one colour.
  • If you’re finding it hard to stop your lines going wonky, don’t stress. Practice makes good – I’m not going to say perfect because mine sure aren’t! You can also switch to an easier design.
  • Remember to clean up around your cuticles afterwards with a cotton tip and a little brush!

Guest Post Nailed in NZ

Just as I started writing this, I decided I wanted to put some glow-in-the-dark polish over the top – doesn’t it look cool??
Guest Post Nailed in NZ

Well that’s me, thanks for reading and if you haven’t already, come check out my blog at Nailed it NZ! Big thanks to Nicole for letting me guest post and don’t forget to check out her guest post on my blog!

Monday, November 12, 2012

E.T. Phone Home

Hiya friends!  Welcome to the nubbin show!!  I had a couple of breaks last week so had to chop off all my pretty nails :(  So sad, but they'll be back, soon, I hope!

I've got another combined post for today.  For the 31 Day Challenge we have inspired by the supernatural and for the Lazy 15 we have galaxy nails.  I thought I had come up with the perfect idea for this day, but now that I think about it, E.T. isn't really supernatural and the moon isn't really galaxy, but I was pretty stoked about this mani, that I decided to use it anyways.

E.T. Inspired Nails

E.T. Inspired Nails

Again, another "I used 50 different polishes" mani (I've been doing a lot of this lately), so no list of what I used.

Please show some love for my 31 Day Challenge and Lazy 15 buddies, I guarantee you won't be disappointed!

Holla, N

-Kimber at Kimber's Lacquer Korner
-Kat at Hooked On Polish
-Diana at Nails By Diana
-Aly at Wonderland Beauty
-Meredith at Perfectly Polished
-Nicole at The Color Republic
-Kate at The Painted Pony Nails
-Cee at Absolutely Cee
-Sam at Polished Art
-Nail Narcotics
-Nicole at Nicole Gets Nailed
-Shelby at Shelby's Swatches
-Stephanie Louise at All Things Beautiful 
-Mixed Mama
-Joanna @ Sweet Polish of Mine
-Patty Greenberg
-Liz and Lisa @ Lozlosa 
-Mari at Nailista
 -Greta at How Was Your Day?
-Miss L at Beauty by Miss L 
-Gini at Sassy Paints
-Chameleon Stampede 
-Pam at Nail-E-Glance
-Me, Myself, and Polish
-Robin Sparkles 


Friday, November 9, 2012

CHI-CHI-CHI-LE-LE-LE-VIVA-CHILE!!!

Hola mis amigos!!  Welcome to another combined mani post - inspired by a flag for the 31 Day Challenge and Water Marble for The Lazy 15!!

Some of you may remember from my 25 Random Things about Me, that I'm Chilean, Finnish, Italian and Irish.  It's quite the mix and I'm glad I didn't have to think too hard about what flag I wanted to be inspired by.  I decided to pay homage to the country of my dad's birth by doing a water marbled mani inspired by the Chilean flag.  I ended up doing a literal flag instead and the water marble didn't turn out quite as I hoped, but it's there if you look real close - I water marbled the red and the blue, which you can't see very well!!  CHI-CHI-CHI-LE-LE-LE-VIVA-CHILE!!!

Water Marble Chile Flag Nails

Water Marble Chile Flag Nails

Water Marble Chile Flag Nails

This is another one of those, used too many colors to keep track of - it doesn't look like it, but I did :)

Please show some love to the other 31 Day Challengers and the Lazy 15 Challengers by clicking on the links below!!

Holla, N
-Kimber at Kimber's Lacquer Korner
-Kat at Hooked On Polish
-Diana at Nails By Diana
-Aly at Wonderland Beauty
-Meredith at Perfectly Polished
-Nicole at The Color Republic
-Kate at The Painted Pony Nails
-Cee at Absolutely Cee
-Sam at Polished Art
-Nail Narcotics
-Nicole at Nicole Gets Nailed
-Shelby at Shelby's Swatches
-Stephanie Louise at All Things Beautiful 
-Mixed Mama
-Joanna @ Sweet Polish of Mine
-Patty Greenberg
-Liz and Lisa @ Lozlosa 
-Mari at Nailista
 -Greta at How Was Your Day?
-Miss L at Beauty by Miss L 
-Gini at Sassy Paints
-Chameleon Stampede 
-Pam at Nail-E-Glance
-Me, Myself, and Polish
-Robin Sparkles 


Wednesday, November 7, 2012

Lazy Dotticure

Hiya polished peeps!  Welcome to day 3 of The Lazy 15 challenge - dots!

Did I mention that I participated in a secret santa nail polish swap?  I think I might have, anyhoodle, I got this gorgeous Mint Green and we all know I'm not a huge fan of green, but this minty green is so pretty and it has been calling my name for a while now.  Super thankful to Amanda over at the Nail Polish Enthusiast for including me in the Halloween/Autumn swap and for drawing my name - our next one is coming up around Christmas and I'm super duper excited!!

I found this really pretty vintage rose with dots mani over at CDesigns 92 and vintage roses look so pretty with minty green, so I decided to try and recreate it!  I wasn't happy with my first try - I covered my black nails with glitter and it totally didn't go with the pink vintage roses, so I had to try again.  This time, I did all my fingers, not just accent ones and it totally turned out how I wanted it!!  Up first is my successful attempt!

Neon Vintage Roses on White with Black Polka Dots

Neon Vintage Roses on White with Black Polka Dots

Neon Vintage Roses on White with Black Polka Dots

Here's the first attempt - it wasn't horrible, I just wish I didn't add the glitter!

Vintage Pink Roses on Mint Green with Black Polka Dots

Vintage Pink Roses on Mint Green with Black Polka Dots

What I used for attempt #2
Base Coat:  Orly Bonder
Base Color:  Finger Paints - Papier Mache
Roses:  Urban Outfitters - No Name Neon Pink and Wet n Wild - Tickled Pink
I used acrylic paint for the dots.
Top Coat:  Seche Vite and Pro FX Quick Dry

What I used for attempt #1
Base Coat:  Orly Bonder
Base Colors:  Wet n Wild - Black Creme and Sally Hansen - Mint Sorbet
Roses:  Revlon - Flirt and Nyx - Nyx - Dolly Pink
Glitter:  Sally Girl - No Name Pink Glitter
I used acrylic paint for the dots.
Top Coat:  Seche Vite and Pro FX Quick Dry

Please show some love to the other bloggers participating in this challenge by clicking on the links below.  Come back Friday for water marble!

Holla, N


Tuesday, November 6, 2012

Popped MAN-icure

Hello lovelies!  Today I have two themes in one mani - a MAN-icure for Polish Days and Inspired by Art for the 31 Day Challenge!!  If you haven't heard of Polish Days, click here to learn more!

November marks the start of Movember a time when men grow mustaches to raise funds and awareness for men's health, specifically prostate cancer and male mental health initiatives.  The hubby has a goatee and a mustache so I'm used to the hairy upper lip, but for you lovelies that have to put up with a month of hairiness, just know it's for a good cause!!  Also, remind your guys that Movember isn't just about growing a stache, it's to raise funds so get them to register online so your friends and family can donate to the cause and see the progress of the growth!!   If you couldn't tell, I was inspired by Andy Warhol's pop art and of course the manly moustache!!  Hope you enjoy!

Pop Art Mustache Nails

Pop Art Mustache Nails

Pop Art Mustache Nails


Please be sure to show some love to the other folks doing the 31 Day Challenge by clicking the links below. As well, please check out the other MAN-icured lovelies participating in Polish Days!!


Holla, N

-Kat at Hooked On Polish
-Diana at Nails By Diana
-Aly at Wonderland Beauty
-Meredith at Perfectly Polished
-Nicole at The Color Republic
-Kate at The Painted Pony Nails
-Cee at Absolutely Cee
-Sam at Polished Art
-Nail Narcotics
-Nicole at Nicole Gets Nailed
-Shelby at Shelby's Swatches
-Stephanie Louise at All Things Beautiful 
-Mixed Mama
-Joanna @ Sweet Polish of Mine
-Patty Greenberg
-Liz and Lisa @ Lozlosa 
-Mari at Nailista
 -Greta at How Was Your Day?
-Miss L at Beauty by Miss L 
-Gini at Sassy Paints
-Chameleon Stampede 
-Pam at Nail-E-Glance
-Me, Myself, and Polish
-Robin Sparkles